Wednesday, August 31, 2011

Jelly Roll Journal Cover

I love Jelly Rolls, they are so fun to work with. My latest Jelly Roll project is a journal cover. I watched a couple of great tutorials on how to make these covers and then came up with my own version.


Instructions and materials.

 
  • One Jelly Roll (you will not need all of it).
  • Quilt Batting
  • Heavyweight Interfacing 18" x 12"
  • Lining one 18" x 12" and two 8" x 12"
  • Velcro closure

 Outside Design and Layers
Sew six 18" Strips together and press; Iron the fusible interfacing to the lining; layer the sewn jelly roll strips, quilt batting and interfaced lining. Machine quilt through all layers as desired.

Pockets for Inserting Journal Cover
Cut two pieces of lining 8" x 12"; trim one edge of each piece with jelly roll strip. To make the double fold trim, cut one strip of 12" in half (1 3/4"). Fold wrong side together and press. Sew raw edges to raw edges of the lining; fold the strip over the edge and topstitch.

Fold Over Velcro Tab
Cut an 8" piece of jelly roll strip and an 8" piece of heavy interfacing; Iron on interfacing; Fold over right sides together, sew sides and turn right side out, press and top stitch. Attach one side of the velcro closure to the tab and the other side to the outside fabric. Pin the tab to the edge of the outside fabric.

Finishing
Pin lining pockets to right side cover and sew three sides, trim seams and corners and turn; Make a bookmark ribbon from double fold 15" x 1 3/4" jelly roll strip. Sew into place and top stitch center part of cover on edges.

I have made several of these. I like this method it is easy and fun and makes a pretty journal.
This one is for sale on my Etsy Shop. Bel Aire Village


Monday, August 15, 2011

Back to School

Well school has started. Sewing projects will be primarily limited to weekends now. I have now transitioned from full time sewer back to full time Algebra teacher and I've added Geometry to the list this year. That's ok though because I do believe my understanding of math and spatial relationships is what helps me do a better job with my sewing projects.

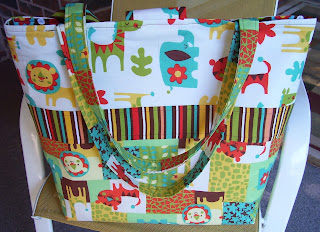
This weekend I made a diaper bag and binky holder. Turned out very cute. I used a pattern I found in an old book I picked up at a local estate sale. I made just a few changes because I can't seem to follow a pattern exactly. I always have to put my own little spin on it.

I used three different coordinating fabrics for the outside of the bag and a fourth fabric for the lining. The lining is the same measurement as the finished outside of the bag. (19" x 36"). The straps are 27" x 4" folded onto 2" heavyweight fusible interfacing. I also added fusible interfacing to the lining and the outside of the bag.

Then there was the "binky bag". It can be very deceiving to look at a large bag and a small one. You would think the small one would be much easier to make than the large. Not true. The small one was difficult. I will not be making anymore small items.


Here is the bag. My daughter-in-law picked out the fabrics. She has wonderful taste.

Catherine

Tuesday, August 9, 2011

3 - Ring Binder Cover

This is the latest in my collection of 3 - Ring Binder Covers. This is a fabric cover that goes over a standard 1" three ring binder. It is made of red bandana fabric with a denim sash and pocket cut from recycled Levi's.

Materials:
3/4 yd of fabric
23" x 3" strip of denim fabric
1 denim jean pocket
1/2 yd heaveyweight Pellon fusible interfacing


I used the same fabric for the outside and the lining. I cut two rectangles 23" x 13", and one rectangle of heavyweight fusible interfacing. For the inside pockets I cut two pieces of the same fabric 10" x 13" and two 8" x 10" for the pockets.

Denim strip 23" x 3". I sewed this strip on with a decorative stitch using a contrasting thread 1/2" from the edge, then clipped the edges to help the denim fringe better. I then sewed the pocket on using my zipper foot to get close to the edge clipped the edges and washed the fabric to get the denim to fringe.


I trimmed the fusible interfaction 1/2" all the way around and then ironed it to the lining.

The top edge of both of the inside slip pockets is turned under and stitched. I added a red twill tape trim for stability.
Inside front cover:
Turn the right edge of the slip pocket and the notebook cover under 1/4" stitch together.


This binder cover fits a 1" three ring binder. It has two slip pockets on the inside of the cover and one denim pocket on the outside.


Catherine
Bel Aire Village Unique Handmade Accessories


Wednesday, August 3, 2011

Living With Your Mistakes

I broke my third seam ripper today. There are some days when you end up with two left sides and some days when a sewing a straight line is beyond the realm of possibilities.  I know, I know I'm exaggerating.

If you can learn something from a mistake then it becomes a valuable experience. Three things I have learned today.

1.  Design your patter first, even if you think you can make it without one, make one anyway.
2.  Left and right sides are not interchangeable, double check before you sew.
3.  I don't like seam tape.

The bottom line is if you persevere something good will result. I ended up with three of the cutest notebook covers. The end results are some pretty fabric covers for 3/4" binders.


Monday, August 1, 2011

Sewing is Good for your Heart

Sewing is Good for Your Heart

I have to sew. I make a little bit of everything but one of my new favorites is my handmade quilted handbags. I always knew sewing was good for me; but recently I read an article that actually explained it.

There was a research study done on the subject by a New York University psychologist. He took 30 women and measured their blood pressure, heart rate, perspiration rate, and skin temperature after they had participated in five different activities requiring similar eye-hand movements:  sewing, card games, video games, painting, and reading. Sewing proved to be the most relaxing. The results showed improved readings in heart rate, blood pressure and perspiration.

A Harvard University doctor says that repetitive and rhythmic activities such as those in sewing evoke what he calls the relaxation response – a calming reaction proven to enhance health.

I won’t give up my heart healthy exercise and diet plan but I will definitely include time in my schedule for relaxing in my sewing room, especially after a stressful day in the classroom.

You can view my new handmade quilted handbags at this link: